Kubernetes is a fantastic tool for managing applications, version upgrade is as easy as changing a tag, more or less :) but has some limitations when you need advanced scheduling options.
Before going further, you’ll need to read https://github.com/ContainerSolutions/k8s-deployment-strategies. It will provide you a comprehensive explanation of available options for native kubernetes deployment.
In this post, we are going to explore how we can manage canary and blue-green deployment using argo rollouts.
![]()
Concept and challenge
The default update strategy is “rollingUpdate” and will incrementally updating pods instances with a new one and make sure new created pod is ready (see readiness for more details)
But what if you need more control on your deployment? You’re gonna need additional tools.
Recall some definitions
Canary deployment
is when you upgrade a small subset of an app, and allow a small amount of traffic to access it (e.g: 5% of the total traffic)
Blue green deployment
is when you have two version of a same application running side by side. Blue is the idle environment, and green is the live environment.
By doing that, you can test the new application behaviour, validate everything is ok, and switch all the traffic to the green environment when ready.
Argo rollouts introduction
Installation
Argo rollout is deployed on your cluster with a controller and a set of CRD. Install is pretty simple, it’s only two commands to run.
kubectl create namespace argo-rollouts
kubectl apply -n argo-rollouts -f https://raw.githubusercontent.com/argoproj/argo-rollouts/stable/manifests/install.yaml
Management
kubectl command will work as usual, for convenience, they also provide a plugin which work with kubectl.
# Example of command
kubectl argo rollouts list rollouts
Convert existing manifest
If you have “classic” yaml manifests, you can easily switch to Argo rollouts by changing three fields:
- Replacing the apiVersion from apps/v1 to argoproj.io/v1alpha1
- Replacing the kind from Deployment to Rollout
- Replacing the deployment strategy with a blue-green or canary strategy
Argo rollouts deployment
Note that canary and blue green deployment can be performed using native kubernetes. But it has to done manually and using multiple steps.
The benefit of using Argo is that these steps are managed by the controller, plus you have additional capabilities during an upgrade. We’ll cover that in the next sections.
Deploy a demo app with Canary
We will deploy the v1 of an application, then upgrading to v2 using canary .
The app is an http server which returns the pod name and app version. The app version output is managed by an environment variable, in the next section, we will change it to trigger an upgrade.
# App output
Host: my-app-5ff5499f6b-bjrvt, Version: v1.0.
Argo provides these additional capabilities for canary:
- Fine grained control: You can define the different batch size during the upgrade (e.g: upgrade 20%, then 40%, then the rest of the pods)
- Speed control: you can wait a specific amount of time between these batches, or wait for a human validation before continuing.
For simplicity, I’ve put the rollout and service in the same file.
The manifest below define the image, number of replicas, environment variable to use, etc. But more importantly define the different steps during an upgrade:
- Deploy 20% of the total replicas (set to 10)
- Pause the deployment, until a user manually “promote” it
- Continue with 40%, wait for 10s.
- Continue with 60%, wait for 10s
- Continue with 80%, wait for 10s
- Continue to reach 100% (this step is invisible and is actually after the last pause step)
# Content of rollout.yml

apiVersion: argoproj.io/v1alpha1
kind: Rollout
metadata:
  name: my-app
  labels:
    app: my-app
spec:
  replicas: 10
  strategy:
    canary:
      steps:
      - setWeight: 20
      - pause: {}
      - setWeight: 40
      - pause: {duration: 10}
      - setWeight: 60
      - pause: {duration: 10}
      - setWeight: 80
      - pause: {duration: 10}
  revisionHistoryLimit: 2
  selector:
    matchLabels:
      app: my-app
  template:
    metadata:
      labels:
        app: my-app
        version: v1.0.0
      annotations:
        prometheus.io/scrape: "true"
        prometheus.io/port: "9101"
    spec:
      containers:
      - name: my-app
        image: containersol/k8s-deployment-strategies
        ports:
        - name: http
          containerPort: 8080
        - name: probe
          containerPort: 8086
        env:
        - name: VERSION
          value: v1.0.0
        livenessProbe:
          httpGet:
            path: /live
            port: probe
          initialDelaySeconds: 5
          periodSeconds: 5
        readinessProbe:
          httpGet:
            path: /ready
            port: probe
          periodSeconds: 5
---

apiVersion: v1
kind: Service
metadata:
  name: my-app
  labels:
    app: my-app
spec:
  type: NodePort
  ports:
  - name: http
    port: 80
    targetPort: http
  selector:
    app: my-app
When you apply the manifest for the first time, ALL replicas will start without following the strategy. (More details at the end of the post)
kubectl apply -f rollout.yml


kubectl get rollout
NAME     DESIRED   CURRENT   UP-TO-DATE   AVAILABLE
my-app   10        10        10           10
Here’s the graphical representation with kubeview.

We can now modify our yml file to switch to the v2 of our application.
# Content of rollout.yml (truncated)

...
  template:
    metadata:
      labels:
        app: my-app
        version: v2.0.0 #Changed here
      annotations:
        prometheus.io/scrape: "true"
        prometheus.io/port: "9101"
    spec:
      containers:
      - name: my-app
        image: containersol/k8s-deployment-strategies
        ports:
        - name: http
          containerPort: 8080
        - name: probe
          containerPort: 8086
        env:
        - name: VERSION
          value: v2.0.0  #Changed here
Apply the new manifest
kubectl apply -f rollout.yml
Watch the canary upgrade in live
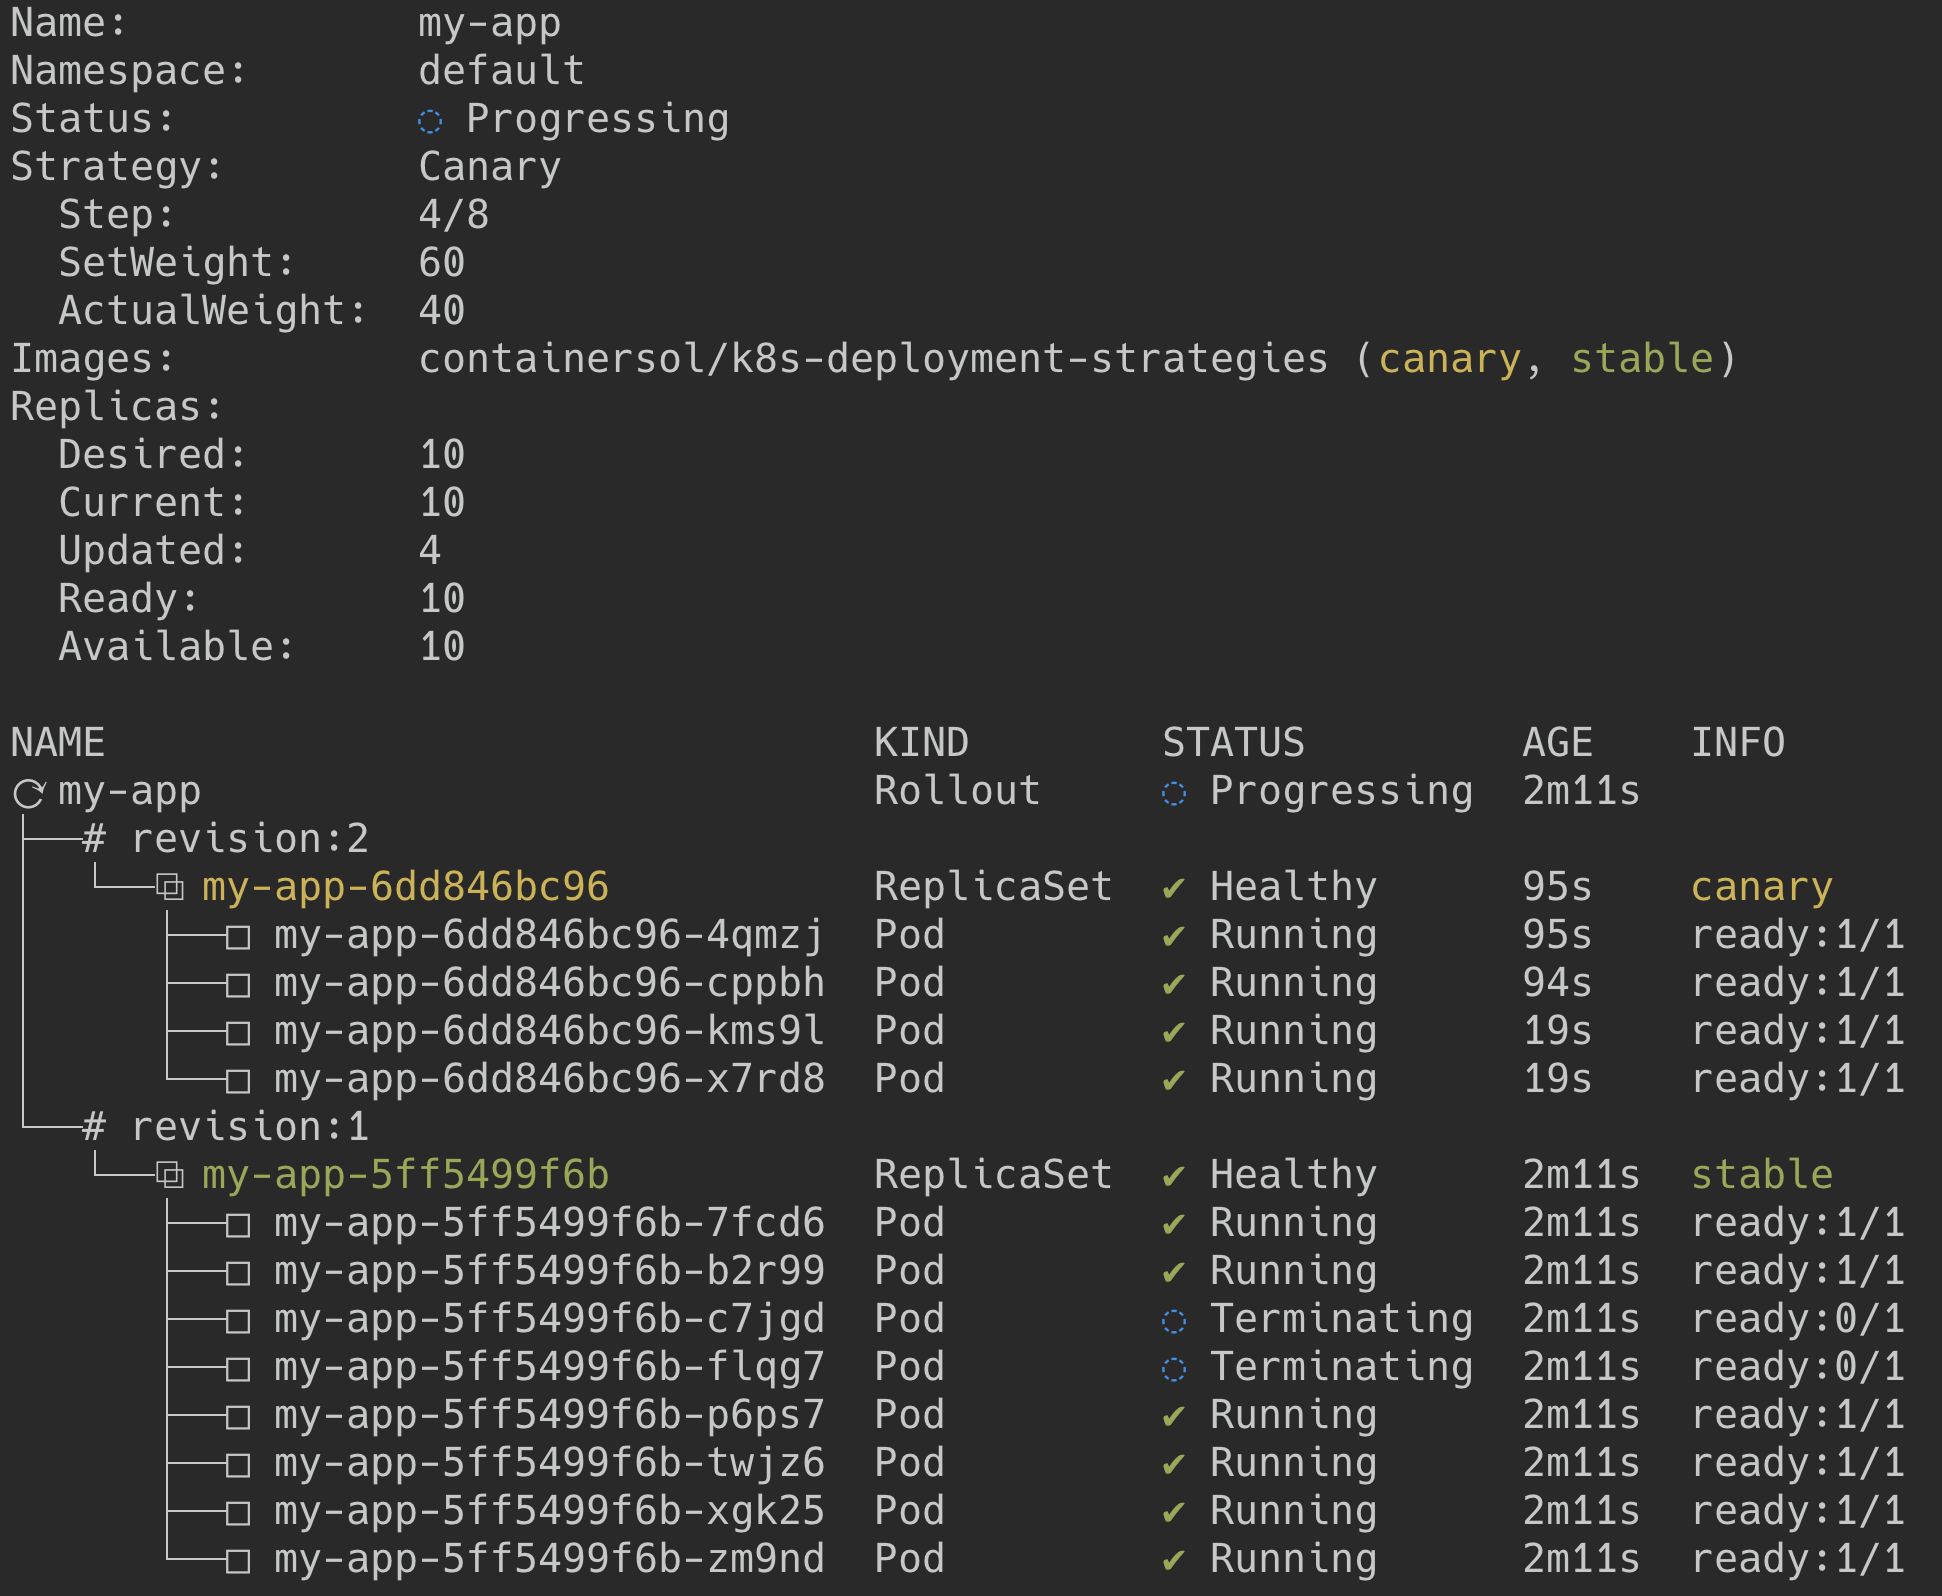
kubectl argo rollouts get rollout my-app --watch
Like expected, we now have 20% of traffic to v2 and 80% to v1, the deployment has paused and is waiting for a human validation.

You can verify it by checking the application response
for i in {1..10}; do curl "$service"; done
Host: my-app-5ff5499f6b-qjbh8, Version: v1.0.0
Host: my-app-5ff5499f6b-rknfk, Version: v1.0.0
Host: my-app-6dd846bc96-ghdhl, Version: v2.0.0
Host: my-app-5ff5499f6b-rknfk, Version: v1.0.0
Host: my-app-5ff5499f6b-z2bst, Version: v1.0.0
Host: my-app-5ff5499f6b-fpp6l, Version: v1.0.0
Host: my-app-6dd846bc96-vfwk8, Version: v2.0.0
Host: my-app-5ff5499f6b-z2bst, Version: v1.0.0
Host: my-app-5ff5499f6b-mczv8, Version: v1.0.0
Host: my-app-5ff5499f6b-ddxgt, Version: v1.0.0
If the application looks fine to you, you can now validate the rollout and promote it.
kubectl argo rollouts promote my-app
The upgrade process continues following the steps we defined before.
Deploy a demo app with Blue Green
To keep this post short, this part will be shorter than the previous one.
Basically a blue green deployment manifest looks almost the same than the canary. The main two values to retain are:
- activeService(which point to the kubernetes service of version1)
- previewService(which point to the kubernetes service of version2)
Both versions of the application are running alongside, each one has his own kubernetes service and the switch from v1 to v2 is made by pointing the activeService to the replicaSet of v2.
Create the v1 application
kubectl apply -f https://raw.githubusercontent.com/argoproj/argo-rollouts/master/examples/rollout-bluegreen.yaml
Note that both services point to v1 for now, it’s fine, because, in a real-world, we would only allow traffic to the active service.

Create the v2 application
Modify the image tag of the application to trigger an upgrade.
kubectl argo rollouts set image rollout-bluegreen \ # rollout-bluegreen is the rollout's name
  rollouts-demo=argoproj/rollouts-demo:green # rollouts-demo is the container name we set in the yaml
You should now have v1 and v2 running alongside. (It’s not obvious on the diagram, but each service points to one version of the app)

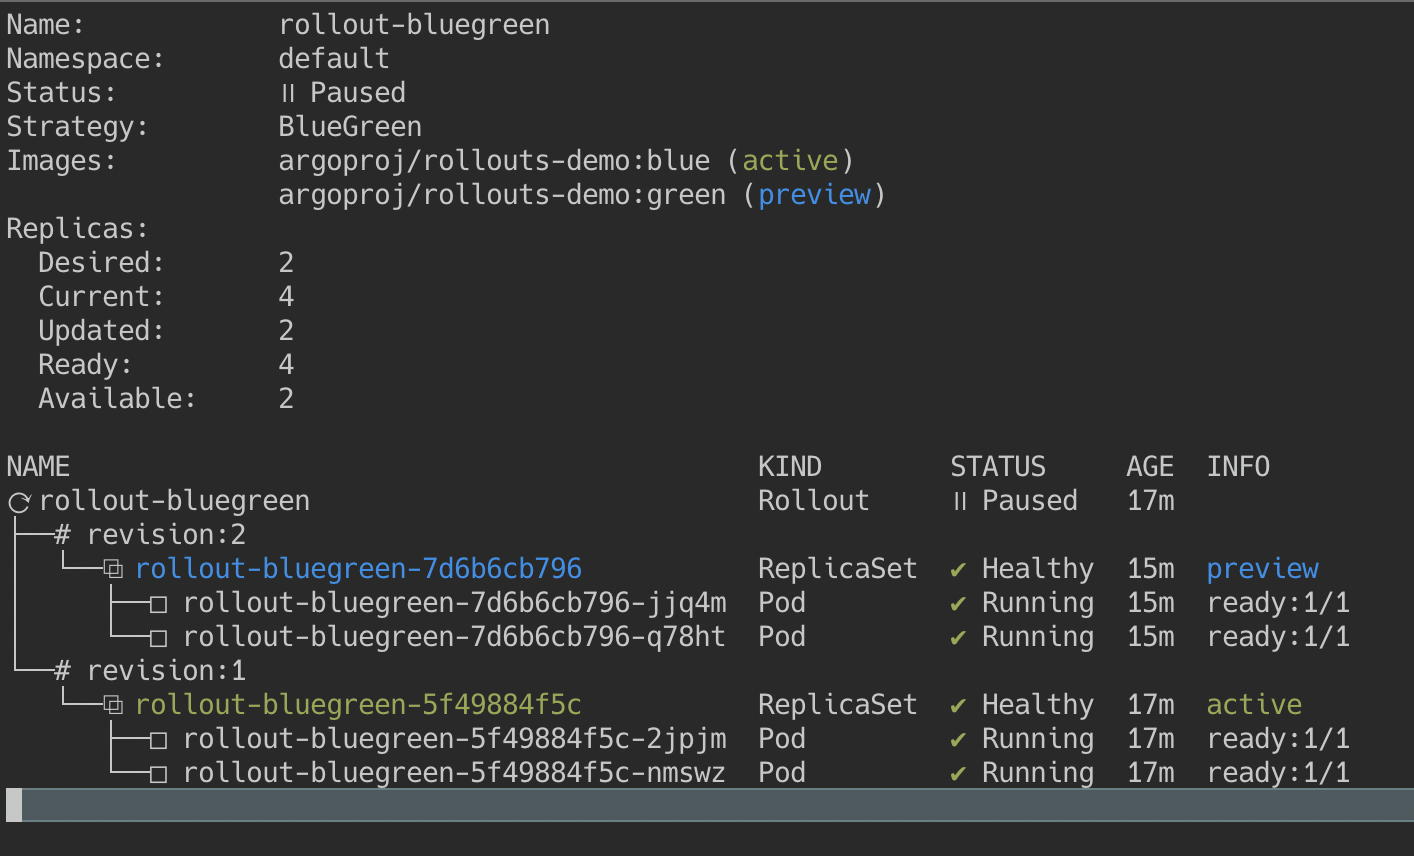
If the application looks fine to you, you can now promote the rollout.
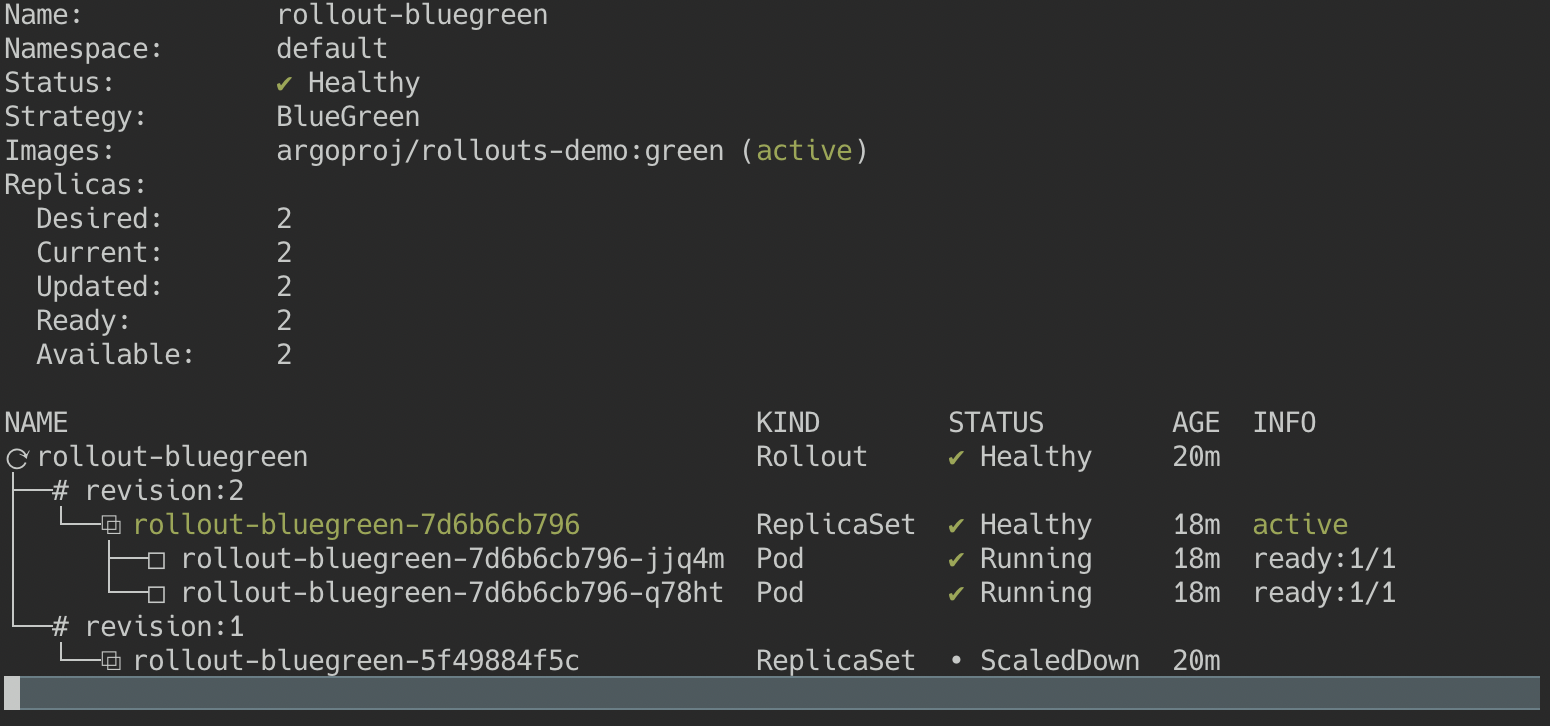
kubectl argo rollouts promote rollout-bluegreen
The ActiveService now points to the v2 ReplicaSet and Argo scaled down the v1.

Conclusion
I did not talk about advanced feature like “Analysis” which allow to test your application during an upgrade via a prometheus query. Argo can decide to abort or continue the upgrade based on metrics you’ve defined.
I had one issue when I created a blue-green deployment, I was trying to upgrade the existing application used in the canary section, but Argo automatically switched the old version of the app to the new one, without honoring the parameter ‘autoPromotionEnabled: false’.
It’s a known limitation:
As with Deployments, Rollouts does not follow the strategy parameters on the initial deploy. The controller tries to get the Rollout into a steady state as fast as possible.
Once the Rollout has a stable ReplicaSet to transition from, the controller starts using the provided strategy to transition the previous ReplicaSet to the desired ReplicaSet.
I hope you liked this introduction to Argo rollouts ;)